INTRODUCTION
by Bill Fawcett
You are in command. With a blare of trumpets punctuated by a hurriedly barked order, it's off to battle. Following behind are ships full of your men, trained spacemen whose lives depend upon the decisions you are about to make.
The Combat Command series puts you at the head of science fiction's toughest soldiers. In this book you are Emerald, in command of the fleet sent by Hope Hubris to flank the Marianas pirates in the climactic battle of volume two of Bio of a Space Tyrant, Mercenary.
Combat Command books provide one more chance to read about a favorite science fiction world and its familiar characters. These books are also a game. In each section of this game/book a military decision is described. You are given the same information as you would actually receive in a real combat situation. At the end of each section are a number of choices. The consequences of your decision are described in the next section. When you make the right decisions, morale improves and you are closer to completing your mission. When you make a bad decision, men die . . . men who are not going to be available for future battles.
FIGHTING BATTLES
This book includes a simple game system, which simulates combat and other military challenges. Playing the game adds an extra dimension of enjoyment by making you a participant in the adventure. You will need two six-sided dice, a pencil, and a sheet of paper to "play" along with this adventure.
COMBAT VALUES
In this book the force you command will consist of Emerald's Space Fleet, its crewmen, and marines. Each ship or man is assigned five values. These values provide the means of comparing the capabilities of the many different military units encountered in this book. These five values are:
Manpower
This value is the number of separate fighting parts of your force. Each unit of Manpower represents one man, ship, or part of a larger ship. Casualties are subtracted from Manpower.
Ordnance
The quality and power of the weapons used is reflected by their Ordnance Value. All members of a unit commanded will have the same Ordnance Value. In some cases you may command two or more units, each with a different Ordnance Value. In this book the Jupiter fleet consists of several classes of comparable smaller ships, nine drones, and two major ships that have exactly twice the Ordnance Value of the smaller craft.
Attack Strength
This value indicates the ability of the unit to attack an opponent. It is determined by multiplying Manpower by Ordnance (Manpower x Ordnance = Attack Strength). This value can be different for every battle. It will decrease as Manpower is lost and increase if reinforcements are received.
Melee Strength
This is the hand-to-hand combat value of each member of the unit. In the case of a squad of mercenaries, it represents the martial-arts skill and training of each man. In crewed units such as tanks or spaceships, it represents the fighting ability of the members of the crew and could be used in an assault on a spaceport or to defend against boarders. Melee Strength replaces Ordnance Value when determining the Attack Strength of a unit in hand-to-hand combat.
Stealth
This value measures how well the members of your unit can avoid detection. It represents the individual skill of each soldier or the Electronic Counter Measures (ECM) of each spaceship. The Stealth Value for your unit will be the same for each member of the unit. You would employ stealth to avoid detection by the enemy.
Morale
This value reflects the fighting spirit of your troops. Success in battle may raise this value. Unpopular decisions or severe losses can lower it. If you order your unit to attempt something unusually dangerous, the outcome may be affected by their morale level. For example, in a situation where you are Teddy Roosevelt and have just ordered the Rough Riders to charge up San Juan Hill, the directions would read:
Roll two six-sided dice.
If the total rolled is the same as, or less than, the Rough Riders' Morale Value, turn to section 24.
If the value rolled is greater than their current Morale Value, turn to section 31.
In section 24, the riders follow you as Teddy Roosevelt up the hill and into history.
In section 31, they have lost faith in you and refuse to attack.
THE COMBAT PROCEDURE
When your unit finds itself in a combat situation, use the following procedure to determine victory or defeat. This system uses a random dice roll combined with the situation itself to determine the casualties on both sides. You roll first for yourself and then for the enemy, The unit you command always fires first unless otherwise stated.
The steps to fight a combat are:
1. Compute the Attack Strength of your unit and the opposition (Manpower x Ordnance or Melee Value). The manpower changes as you suffer losses. The Ordnance Value remains constant.
2. Casualties will be determined according to charts found at the end of this book. The description of the battle will tell you which chart to use. You must turn to the proper chart before you can fight the battle.
3. Roll two six-sided dice and total the result.
4. Find the Attack Strength of the unit at the top of the chart and the total of the dice rolled on the left-hand column of the chart. The number found where the column and row intersect is the number of casualties inflicted.
5. Repeat for your opponent's side, alternating attacks until all of one side is eliminated.
When you are told there is a combat situation, you will be given all the information needed for both your command and their opponent. Also listed are any unusual factors and what effect they will have on the battle. All combat is resolved by a dice roll and the charts included at the end of this book.
Here is an example of a complete combat:
Hammer's Slammers have come under fire from a force defending a ridge that crosses their line of advance. Alois Hammer has ordered your company of tanks to attack.
Slammers fire using Chart B.
Locals fire using Chart D with a Combat Strength of 3 and Manpower of 12 (this will give them an Attack Strength of 36).
To begin, you attack first and roll two 4s for a total of 8. You have computed the current Attack Strength of your Slammers to be 64.
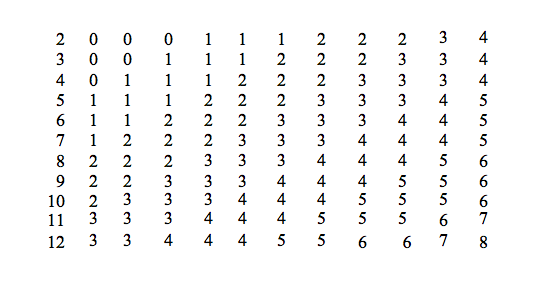
CHART B
Attack Strength
1-10 -20 -30 -40 -50 -60 -70 -80 -90 -100 101+
Dice
Roll
Read down to 60-70 Attack Strength column until you get to the line for a dice roll of 8. The result is 4 casualties inflicted on your opponents by your company.
Subtract these casualties from the opposing force before determining their Attack Strength. (Combat is not simultaneous.) After subtracting the 4 casualties your company just inflicted on them, the enemy has a remaining Manpower Value of 8 (12 - 4 = 8). This gives them a remaining Attack Value of 24 (8 x 3 = 24). Roll two six-sided dice for the opposing force's attack and determine the casualties they cause your Slammers company. Subtract these casualties from your Manpower total on the Record Sheet. This ends one "round" of combat. Repeat the process for each round. Each time a unit receives a casualty, it will have a lower value for Attack Strength. There will be that many fewer men, tanks, spaceships, or whatever firing.
Continue alternating fire rolls, recalculating the Attack Strength each time to account for casualties, until one side or the other has lost all or its manpower or special conditions (given in the text) apply. When this occurs, the battle is over. Losses are permanent and losses from your unit should be subtracted from their total Manpower on the record sheet.
SNEAKING, HIDING, AND OTHER RECKLESS ACTS
To determine if a unit is successful in any attempt relating to stealth or morale, roll two six-sided dice. If the total rolled is greater than the value listed for the unit, the attempt fails. If the total of the two dice is the same as or less than the current value, the attempt succeeds or the action goes undetected. For example:
Rico decides his squad of Mobile Infantry (MI) will try to penetrate the bughole unseen. MI have a stealth value of 8. A roll of 8 or less on two six-sided dice is needed to succeed. The dice are rolled and the result is a 4 and a 2 for a total of 6. They are able to avoid detection by the bug guards.
If all of this is clear, then you are ready to turn to section 1 and take command. If you'd like another example of play, read on: You are in command of a ten-man U.S. Army patrol in France, World War II, fall 1944 . . . fade to the distant sound of artillery fire.
1st Squad
2nd Platoon
B Company
29th Division
U.S. Army
Manpower 10
Ordnance 4
Stealth 9
Morale 10 (after all. we're winning)
Melee 5
This squad has an initial Attack Strength of 40 (4 x 10) in a firelight. It has an initial Attack Strength of 50 in a hand-to-hand melee (5 x 10).
Your squad is ordered to penetrate enemy lines to determine if a battery of artillery is concealed in the village of Soissons. There are no known German positions and the front is still fluid. You have crossed into Nazi-controlled territory.
You had walked a long way since Omaha beach and your feet were sore. As the squad moved through the last of the pickets you signaled for Corey Roberts to take the point. The trooper freed his Ml and trotted on ahead. The sun had just risen; the air was filled with the acrid odor of cordite from our own artillery. Somewhere, a few miles in the rear, you could hear the roar of a battery firing on some unseen target. Everyone hoped it would distract the Nazis, but knew better.
The next few hundred yards were uneventful. The front was new here; neither side had had time to establish a continuous line. Suddenly Lewis whispered an urgent command and everyone froze. Up ahead Roberts was crouched behind a tree, gesturing at a clump of bushes a few yards ahead of him.
After a few tense moments you could see the first German as he emerged from the bushes. Moments later three more followed. All were armed with submachine guns and wore the black uniforms of the SS. They were moving very cautiously. The Germans didn't appear to have spotted you.
If you attack the German patrol, turn to section 41.
If you wish to remain concealed and let them pass, turn to section 42.
41
The Americans attack on Chart B.
The Germans fire back on Chart D. Their submachine guns have a firepower of 6, giving them an initial Attack Strength of 24.
If you win the battle, turn to section 55.
If you are defeated, turn to section 29.
The American patrol attacks first. You roll two six-sided dice and total them. They are a 4 and a 3 for a total of 7. Looking down the column for an Attack Strength of 40 until you reach the row for a dice roll of 7, we see you killed 2 of the Nazis.
You would then roll for the 2 remaining Germans' return fire. In this case you roll a 4 and a 5 for a total of 9. Since each German with an SMG has an Ordnance Value of 6, this gives the 2 men a remaining Attack Strength of 12 (2 x 6). Looking in the 1-20 column of Chart D next to the 9, we see they cause 1 casualty. One man is subtracted from the Manpower of the American patrol, leaving a total now of 9 men and an Attack Strength of 36 (9 x 4 = 36, as the Ordnance Value of the remaining men never changes).
This completes one round of combat.
A second round is then begun with the Americans again firing first. Two six-sided dice are rolled for a total of 10. Checking on Chart B in the 30-40 column for a roll of 10, we find that this fire was sufficient to kill three more Nazis. As only 2 remained, the combat is over immediately (there being no return fire from the SS troopers since they are all dead). You would then turn to section 55.
42
Roll two six-sided dice. If the total is the same as or less than 9, turn to section 46.
If the total is greater than 9, turn to section 47.
Here you are trying to remain undetected and so will be rolling against the squad's value for Stealth, which is a 9. Any total except a 10, 11, or 12 would indicate success. If the two dice were to roll a 5 and a 2 for a total of 7, your patrol will escape detection. You would then turn to section 46 and continue the mission.
Special Rules for Cut by Emerald
USJ SHIPS' ORDNANCE VALUES
All ships except the cruisers and drones have an Ordnance Value of 7. The cruisers have an Ordnance Value of 14 and should be counted as 2 Ships (2 x 7 = 14) when computing the Ordnance Value of the fleet firing as a whole. A drone is expended when fired, and for that round only has an ordnance value of 21. Once a drone is used, it is destroyed and should be crossed off your record sheet. Treat a drone, on the turn expended, as 3 ships firing (3x7 = 21).
USJ LOSSES
The type of ship that must be taken as a loss when a hit is made on the USJ fleet will often be specified in the text. If no type is specified, then the loss may be taken by any ship that was engaged in the combat. This can only include drones that have not yet attacked, as these self-destruct during their attack. You may attack with the drones only when instructed to do so. Even though cruisers fire as 2 ships, they count as only 1 ship for losses. The Inverness must be the last ship taken as a loss. When it is destroyed, the game is over and you should turn to section 29. The minesweeper, Risk, must be taken as the second to last, as it tends to avoid most combat.
A record sheet has been provided to assist you in keeping track of the USJ ships remaining.
TIME
Emerald not only has to cross the hostile territory, but also be in place for the flank attack just as Hope and the main fleet pass by. Each action or series of actions in the adventure takes time. At the end of certain sections, you will be given the amount of time that has passed. A record sheet, marked off in half-hour segments, has been included to assist you in keeping track of the time you expend. If more than 12 hours pass before you reach the planned battlefield, you have failed and should turn to section 29.
FINAL FORCE STRENGTH
When arriving at the battlefield, your fleet must consist of no less than 5 ships of any class. As the Inverness and Risk are the last 2 ships that can be taken as losses, they will he among these ships. If, when asked, your fleet has fallen below this level of strength, then there is not enough force left to make an effective flanking attack and you have failed. In this case you should turn to section 29 and follow the instructions given there.
You are now ready to assume command. Turn to section 1.